Showing posts with label before and after. Show all posts

Monday, 31 August 2015

First ever canning and I'm in love!!!

With a fridge full of tomatoes I had my first ever attempt at canning this bank holiday weekend. After  literally years of reading about canning and pinning about canning and internet window shopping about canning I have finally done it!!!

To say it is a proud moment is an understatement. I laughed a little when Kymber said I'd be thinking about canning green tomatoes, cuz guess what, the thought had crossed my mind. It has seemed as though the tomatoes have taken forever to ripen this year, it could be the fact that summers been a bit non-existent. But I swear, they were taunting me, knowing my desperation to can them.

So I picked tomatoes for the first attempt as they could be water bath canned with my stock pot and apart from having to buy mason jars it was a cheap new hobby. I was a bit sad that my bargain jar rack didn't fit the pot, but I took another readers suggestion and used the rings from the unused jars in the bottom of the pot.


I chose a recipe from the Ball website called Basil-garlic tomato sauce. Like most families we eat a lot of pasta as it's easy and filling and the kids love it. Full tummies means good sleep, sold! Here's the link if you fancy a look. The only thing I changed was I added a teaspoon of salt and a tablespoon of sugar and it really helped the taste. Next year I'll plant some garlic and then it can be all home grown.

10lbs of tomatoes made 3 pints of sauce, which I figure is about 6 meals. My maslin pan was great for reducing the sauce, it's measure marks meant I could stop reducing the sauce when I knew there was just the right amount for three jars, so there were no half filled jars. 


I'm going to try a few half recipes to see what I like before I start making in bulk. This sauce was very good though so I will definitely make it again. For the time being I have added a pressure canner to my Amazon wish list and I'll look at it longingly every time I buy something else, a girl has to dream big.


On another topic, as the rain fell all night our garden looks like the Somme. Our digger friend put in all the services for the cabin in the trench and covered it over, what a massive job done, I am super grateful we didn't have to do it ourselves. It is worth every penny of someone else's time right now.

Before

After

So for now I just keep admiring my three jars of sauce and I've told James they're for special occasions. He seemed to think I meant the kids weddings?!

Sunday, 7 June 2015

Little man's bedroom overhaul day 1 & 2

We decided that it's time to start work on the wee man's room so that it's insulated in time for winter. James has this coming week off work so we can get as much done as possible in one go. Little man is in our room with us and as I'm still getting up to feed baby girl in the night we want to keep the disturbance as short as possible.
We started work yesterday and here are a few pictures of the room first thing in the morning.


We got the last bits into boxes and moved the furniture then waited for baby girl to have her nap. We drained the radiator and took it off the wall and took down the curtain poles. Next step was to get out the hammer and chisel and knock seven shades of hell out of the walls. We used an SDS drill with chisel attachment and good old fashioned elbow grease. We worked along the walls until they were bare and then tidied up. But boy doesn't the tidying take longer than you think it will!
A local friend of mine had the little man for me for an hour and a half and baby girl had her nap just as I dropped him off so we got some solid time together doing demolition.

So here's the pics of the room at the end of the afternoon.


Today we took the fireplace out and put it somewhere safe to strip all the gloss off it at some later point. We cleared out all of the bricks and rubble out of the fireplace.

Fire removed but still of rubble

Fireplace cleaned out

Next step was to take the skirting boards off. Finally we took off all of the plaster around the windows, we can now see daylight around our crappy windows. Probably not a bad thing though as they have so much condensation in them the small gaps are the most we can see out!!

Skirting off

Plaster around the windows knocked out
Finally for today we have built stud work on the largest wall with vertical studs at 400mm intervals to put the plasterboard on later in the week.


Batens put up in the largest wall ready to fill with insulation

Tomorrow's job is to screw plasterboard to the ceiling and then screw the stud work onto the wall and start building the stud for the other two walls. I'll try and get a bit of time to let you know the progress in the next few days.

My favourite pictures though from today have to be the wee man getting involved. He just picked up the hammer and started posing. *No child labour went into the making of this post.


Saturday, 6 June 2015

Chair Makeover


I bought this lovely chair about 3 years ago for £5. It's beautifully turned and evidently quite old. I've always had a thing for Victorian pine furniture and it's actually quite fashionable at the moment. That's great as it makes my house suddenly seem quite fashionable but unfortunately it means it costs more. I'm not sure what wood it is, it's not the colour for pine but that's about as far as my knowledge goes. I love that it's been around for over 100 years and has history, not to mention, boy they made stuff well and it lasts. I've been meaning to do it for ages but to be honest I've been balancing precariously on it for 10 minutes a day whilst I do my hair and makeup for over 3 years.
I saw a pin on pinterest on how to upholster a dining chair so I thought I'd get started. 

The chair before it's bath

As you can see the chair had never had a seat, judging by the holes in it I imagine there was some kind of woven reed seat at some point.

First things first I gave it a good clean up with warm water and washing up liquid.

Next we put PVA in the joints that had come apart and hammered them together with a rubber hammer. We used bungee cords to keep the joints tight whilst the glue dried.

I used some pinterest research to find a method to refinish wood furniture. I decided on a recipe that mixes three quarters olive oil with one quarter vinegar. The site suggests apple cider or white wine vinegar. Now the cider vinegar is for the chooks, white wine is for cooking. In my cupboard that left red wine vinegar (still cooking), malt vinegar (for my chips) and distilled (for pickling). I went with distilled as it's cheap and colourless. I mixed them in a jam jar, shook it and rubbed it on with a duster. I was really surprised but it brought out the colour in the wood, leaves no residue and has stayed looking lovely even once it dried.


Before and after the homemade wood finish


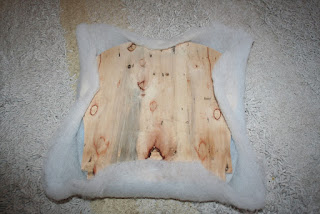
As the chair needed a seat pad, I traced the outline of the seat onto some card and used it to cut a seat from some plywood that came as part of a delivery crate.

Cut plywood base

I used another pinterest find from the The family handyman to upholster the pad. I used a 2 inch foam seat pad, some batting and some fabric from a closing down sale at a local fabric shop (sad times I spend hours here as a kid)

Here's a quick how to for those that are interested

        1 Place the batting on a table top, followed by the foam and then the wooden seat. Cut the batting about 4 inches larger than the seat pad. Pull the batting taught and put one staple in each of the four sides. I also added a rolled up piece to the rear corners of my pad as it was ever so slightly too small.


2 Cut covering material 4 inches wider than the pad, place over batting. Turn seat over and staple one staple into the front edge. Centre any pattern and staple once along the rear of the seat.

3 Start at the front middle staple and working toward the corners, stretching the material evenly, staple every 2 inches. Keep the staples within an inch of the edge securing the batting and fabric at the same time. Continually check pattern alignment.

4 Repeat along the back of the seat and then the sides.


5 Cut any excess batting and material from the bottom of the seat.

6 Experiment with folding the corners to achieve a neat effect. I found that a different tuck was required on the front and rear of the seat due to the angle of the corner. Staple down and the chair is upholstered.

Rear corner

Front corner

Seat completed and corners stapled in

7 In some tutorials it is suggested you used weed membrane as a dust cover to neaten up the bottom of the pad, but to be honest I didn't bother.

8 Lastly I secured the seat to the chair using some L shaped brackets that I rescued from our old kitchen. They needed straightening but were easy to attach, et voila, c'est fini.
L brackets before straightening


Pad covered

So here's the seat all  spruced up and ready for me to sit on. I just love a decorating project!

The end result


Thursday, 1 January 2015

Baby girls bedroom done!

It's been really cold here and it was so beautiful I had to take some photos. The frost was magical and made the garden seem so peaceful.


I also took some photos of the baby's room, they're not great as I don't have a very wide lens on the camera and I couldn't step back far enough. I'm going to try to find some before pictures to compare with.